|
|
|
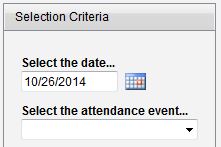
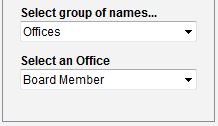
CMD Tablet Attendance App Help How to Access the CMD Tablet Attendance App Select the Attendance Date and Event Using Multiple Devices to Mark Attendance Simultaneously How to Access the Tablet Attendance App Since the Tablet Attendance App is a web app, you access it using the internet browser on a tablet or other device. Use the browser’s address bar to type in the address and app name just as you would enter any other URL. If you have good WiFi coverage in the areas where the app will be used, use the internal network IP address of your CMD’s host computer. For example, if the local network IP address of your CMD’s host computer is 192.168.1.25, then here’s what you’d enter as the URL in the address bar of your browser: 192.168.1.25/cmdtabletatt.html If you do not have WiFi available where the app will be used and your device has access to the internet through cell service, then you must use the remote access IP address or domain name. For example, if you have a Dyn.com account for this purpose, you will type in something like this: mychurchcmdaccess.dyndns.org/cmdtabletatt.html Of course, substitute your actual Dyn.com domain name for the mychurchcmdaccess.dyndns.org in the example above. Using the app with local WiFi and the local network IP address is much preferred because performance will be significantly faster. We suggest that once you get to the Login page when you first run the app, that you save that page to your device’s home screen so that you can access it again in the future simply by tapping its icon. Only those persons with a valid staff-level user name and password in CMD can log in to the Attendance App. When the app is first loaded on your device, users will need to enter their CMD user name and password and then tap the Login button. Note that you will need to log in each time you return to access the app. Select the Attendance Date and Event Before you can mark attendance or view names already marked, you must first specify the Attendance Date and Event. Use the tools provided in the upper left corner of the app: Tap the calendar icon to select a date from the pop-up calendar, and then tap in the Attendance Event combo to open up a list of choices for the attendance event. Note that you cannot modify this list in this app. Additions, modifications, and deletions of items on the attendance event list must be done in the CMD program. When the Attendance App first appears, all the names in your CMD file will be listed in the Names List table in the center of the page. Many times you will want to select from this list. However, there may be times when it will be easier to mark attendance if you are looking at a smaller list of names. For example, if you are marking attendance for a SS class, you can easily limit your list to those names that are marked in CMD as belonging to that specific class. Or, perhaps you wish to mark attendance for a church board meeting. In this case, it would be easiest to mark names from the list of board members rather than having to scroll through all the names in your file to find those few names. In such cases where it would be an advantage to see a smaller list, use the tools provided just below the attendance date and event selection: In the above example, tap the combo box that says Select Group of Names and select Offices. Then you can select the specific office – in this case, Board Member. Immediately the list of names will change to reflect only board members. When selecting the group of names, you can select… All Names Regular Attenders SS Class/Division Membership Status Offices Talents Activities User 1 User 2 Marking Attendance You are ready to mark attendance once you have selected the attendance date and event, and have selected the group of names from which you will be working. To mark a person present, find their name on the list, tap on it, then tap the Mark as Present button in the upper right corner of the page. To mark the next name present, find and tap on that name, then tap Mark as Present again. Continue in this fashion until all the names have been marked that you intend to mark. You will note that the last name you marked present is displayed in the combo box just below the Mark as Present button. If you forget if you’ve marked someone present or not, tap on this edit box and you will see the list. Viewing Names Already Marked If you need to view the list of names that have been marked already for a given attendance date and event, first select the date and event then then tap the button near the upper right corner that says Get Names Already Marked. The list of names will appear in the combo box just above the button. Using Multiple Devices to Mark Attendance Simultaneously You can use multiple devices logged in concurrently to mark attendance for the same attendance date and event. For example, you could have 3 or 4 people using tablets to mark attendance at worship. In this situation, there are a couple of things to keep in mind: The list of names that have been marked present is local to that device only. That is, when you mark a name present, it shows up on the marked list only on that device. However, if you tap the Get Names Already Marked button, all the names marked from all devices will be loaded into the combo box so you can indeed see all the names marked present. This list from all the other devices isn’t updated automatically, but you can periodically tap this button to update the list on your tablet any time you wish. Duplicates As you are marking names, do not be concerned if a person is marked present on more than one tablet. CMD has a utility which can eliminate duplicate entries later on in just a couple of seconds.
|


